

Thank you everyone who left such wonderful Thanksgiving wishes. We had a lovely time with our visitors, and then I took a few days off to recover. lol
I hope your Thanksgiving was a splendid one.
Stacie and I decided to do a 1:1 RR and she sent me her block:


The color scheme? Blue
And the theme? Creepy crawlies!
Isn't this a nice block?
I decided to make a garden scene for the creepy crawlies
I created a thread-wrapped wire form for a tree, and sewed it to the block. Then I added lots and lots of tatted leaves to the tree branches.
I loved the tree. I was so enamored with it, I didn't notice that it overwhelmed the whole block The scale was all wrong for the block theme.
So I frogged it all! sigh.
And I began again.
 This is a layered, woven and split-stitched seam treatment, with tatting on each side. The circular motif at the end of the row was added to lead the eye back around the seam, and not off the end of the block.
 Created with a variegated perle cotton ( thanks, Fox!) I first stitched horizontal bars across the seam, then wrapped and knotted the thread onto each bar as I worked vertically, alternating the direction with each of the seven rows. It is thick, solid, and raised. French knots finish this seam treatment.
 Doubled, variegated Lizbeth thread in 'Peacock Blue' sew these two fabrics together. I liked this effect so much, I had to repeat it elsewhere on the block.
 A row of tatted leaves. Hmmm, I'm not sure I like this.

rick-rack and a 'shrub' with tatted Josephine Knot 'flower clusters' adorn this section. I added gold thread to some of the clusters to echo the gold rows in the fabric.
Don't you just love that snake? Believe it or not, I knit the body using two tatting needles! The eyes and tongue are beaded. I like how snake is wrapped around the trunk of the shrub, and hangs off the branch looking for a meal.
 Two large, hand-painted lace leaves were sewn to the upper right, and a hand-painted lace arbor was added, with a stepping stone path
 I began to add greenery between the stones, changing the size of the french knots as I moved further along the path.

an intersection of seam treatments
 I added tatted greenery and tatted Josephine Knot flowers to the arbor, and then some woven picot stitch leaves.
French knots in browns, greens, and a bit of yellow grow
between the stones.

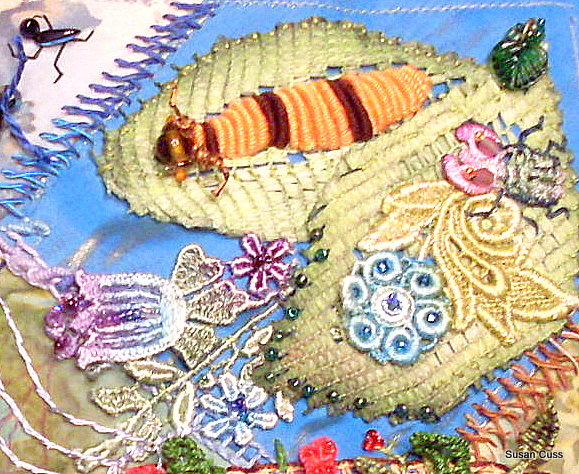
A bullion stitch caterpillar appeared on the lace leaf, and I added a lace flower piece beneath the leaves. Hmm, maybe that caterpillar looks more like a slug? What do you think?
 a different angle

The block so far
The stones were subtly extended into the adjoining fabrics, and grasses were added for the garden setting.
The row of tatted leaves on the seam treatment was covered with a fun trim in blues, greens and tan

adding a dyed lace flower to the hand-painted leaf

a lace bug crawling onto the lace stem
seed beads and a crystal add a bit of sparkle to the blue lace flower
 a beaded spider based on the design of Shawkl's spiders as shown on her blog post tutorial.
 the spider web with a jeweled center and beaded web joins
Now I'd used what I thought was a washable pen to mark the spider web, and stitched it 3 times before the final frogging. Then I went to remove the pen marks. I scrubbed it twice. ARRGH!
Luckily, Stacie is sweet enough to overlook my faux pas, and decided the marks would be shadows. Isn't she wonderful?
other beads were added to seam treatments and the lace flower
 buttonhole stitch in a dark green makes the lace bug stand out a little better, as do its beaded eyes

black ants follow the stone pathway beneath the arbor
( the ants were inspired by Allie Aller's ants in her book
"Allie Aller's Crazy Quilting")
a white inchworm keeps pace
I added brown stitching around certain areas of the arbor to make it appear more dimensional and stand away from the background, since the tones were quite similar to the stones. Brown shading was stitched around the stone's base to create the effect of shadows.
 The block
Is it finished?
Well, I thought so, but then.........
I removed the metal tag on the left that didn't seem to work
maybe the right side was a little dark.....
so I auditioned some white flowers to hopefully lighten and brighten this area and repeat the light tones of the top fabric piece
 The finished block
I had a little problem with the dark blue fabrics: they stretched when I used a hoop to do the embroidery. Has anyone else had that happen before? Were you able to fix it? I was so worried that the stretching would ruin the block. But, my RR swap partner is a gem.
Stacie likes the block! Yay!
It's on its way.
I can't wait to see what Stacie creates for me!
My good friend, Shirl arrives Sunday for a visit, so no Inspirations post this Sunday. I hope to have lots to show you next time.
Wishing you a warm and sunny weekend.
Thanks for visiting.
Hugs from Suz
I hope your Thanksgiving was a splendid one.
Stacie and I decided to do a 1:1 RR and she sent me her block:


The color scheme? Blue
And the theme? Creepy crawlies!
Isn't this a nice block?
I decided to make a garden scene for the creepy crawlies
I created a thread-wrapped wire form for a tree, and sewed it to the block. Then I added lots and lots of tatted leaves to the tree branches.
I loved the tree. I was so enamored with it, I didn't notice that it overwhelmed the whole block The scale was all wrong for the block theme.
So I frogged it all! sigh.
And I began again.


rick-rack and a 'shrub' with tatted Josephine Knot 'flower clusters' adorn this section. I added gold thread to some of the clusters to echo the gold rows in the fabric.
Don't you just love that snake? Believe it or not, I knit the body using two tatting needles! The eyes and tongue are beaded. I like how snake is wrapped around the trunk of the shrub, and hangs off the branch looking for a meal.


an intersection of seam treatments

French knots in browns, greens, and a bit of yellow grow
between the stones.

A bullion stitch caterpillar appeared on the lace leaf, and I added a lace flower piece beneath the leaves. Hmm, maybe that caterpillar looks more like a slug? What do you think?


The block so far
The stones were subtly extended into the adjoining fabrics, and grasses were added for the garden setting.
The row of tatted leaves on the seam treatment was covered with a fun trim in blues, greens and tan

adding a dyed lace flower to the hand-painted leaf

a lace bug crawling onto the lace stem
seed beads and a crystal add a bit of sparkle to the blue lace flower


Now I'd used what I thought was a washable pen to mark the spider web, and stitched it 3 times before the final frogging. Then I went to remove the pen marks. I scrubbed it twice. ARRGH!
Luckily, Stacie is sweet enough to overlook my faux pas, and decided the marks would be shadows. Isn't she wonderful?
other beads were added to seam treatments and the lace flower

black ants follow the stone pathway beneath the arbor
( the ants were inspired by Allie Aller's ants in her book
"Allie Aller's Crazy Quilting")
a white inchworm keeps pace
I added brown stitching around certain areas of the arbor to make it appear more dimensional and stand away from the background, since the tones were quite similar to the stones. Brown shading was stitched around the stone's base to create the effect of shadows.

Is it finished?
Well, I thought so, but then.........
I removed the metal tag on the left that didn't seem to work
maybe the right side was a little dark.....
so I auditioned some white flowers to hopefully lighten and brighten this area and repeat the light tones of the top fabric piece

I had a little problem with the dark blue fabrics: they stretched when I used a hoop to do the embroidery. Has anyone else had that happen before? Were you able to fix it? I was so worried that the stretching would ruin the block. But, my RR swap partner is a gem.
Stacie likes the block! Yay!
It's on its way.
I can't wait to see what Stacie creates for me!
My good friend, Shirl arrives Sunday for a visit, so no Inspirations post this Sunday. I hope to have lots to show you next time.
Wishing you a warm and sunny weekend.
Thanks for visiting.
Hugs from Suz
Wow Suz that is awesome! I love every bit of it! Thanks for posting it and the commentary!
ReplyDeleteThanks Paristex for such a nice comment!
ReplyDeleteOh my! All this beautiful work on 1 block! Lucky girl to receive this.
ReplyDeleteDeb
Wow, I'm uber impressed - fantastic!
ReplyDeleteIt is such fun to see the process photos !! It is so inspiring for us newbies!! your stitching skills are amazing!! I hope that you saved that glorious tree for another project!! Love your Banner photo- simply stunning!!!!
ReplyDeleteThis is so lovely! I am in awe, I love crazyquilting and this goes way beyond anything I have seen.
ReplyDeleteI guess I will have to learn how to tat, I just have to try this and incorporate it in my work.
Congratulations Susan!!!
Hugs
Sandra
Suz your block embellishments are beyond amazing. Each and every detail is superb. This is truly a work of art. Blissful inspiration...
ReplyDeleteThank you, Rie, for leaving such a nice comment!
ReplyDeleteSandra, I'm so pleased you like it! Thanks.
Thank you, Elizabeth. I'm so glad you liked all the pics, as I would hate to bore anyone with too much information. I'm a fan of your work and follow your blog.
Now, I'm still a relative newbie at CQ myself:- this is only the 6th block I've done, and I'm having fun learning as I go. I did save my tree, and all the tatted leaves......you never know when it might come in handy, right?
Thank you so much Createology!
By the way, I found a little envelope from you in my mailbox today. You are so thoughtful.Thank you for the delightful trim and trading card! It's wonderful to find unexpected surprises.
Hugs from Suz
Everything on your block is fabulous. Love the creative texture. My favourite is the path.
ReplyDeleteI'll be looking at my tatting with a different eye now after seeing your Josephine knots.
Thanks for sharing.
Thank you CrazyQstitcher. I love JKs! The path took a looong time to embroider, but I think it works okay.
ReplyDeleteHugs
Susan this is amazing...so many beautiful areas to look at!!!
ReplyDeleteIt is kind of full, isn't it? Guess you could say I never got that 'less is more' thing. LOL
ReplyDeleteI'm glad you like it, Karen. Hope you're having a good weekend.
Hugs
I'm totally speechless looking at this!!! How long did it take you to do all this FABULOUS stitching and tatting? Your concepts are amazing and whimsical! And COLORFUL!! Your photos are excellent! I'm assuming "RR" means 'round robin". Where does the block go from here?
ReplyDeleteHi Kathy. Thanks for the lovely comments.
ReplyDeleteI worked on the block off and on for about five months or so, in between other commitments. We had decided to take our time and not have a deadline since we both were working on other items. Yes, RR means round robin, but this was just an RR between the two of us. Originaly we'd decided to do half the block and then send it home, but once we started, we wanted to finish the block for each other: we were having so much fun we didn't want to stop! The block now goes home to Stacie, and I now wait for my block from her!
Wow! What wonderful stitching. It makes me want to try some of your ideas. Thanks for commenting on my blog.
ReplyDeleteThanks Sandy, I had lots of fun learning new stitches for this block. Hope you've had a nice weekend.
ReplyDeleteHugs
You put so much thought and work into this block! It turned out wonderfully. I have had some fabrics stretch when I work with them. It usually isn't that noticeable once the block is full of stitching and embellishments. You did a great job on this block!
ReplyDeleteThis is a beautiful block and full of inspiration....
ReplyDeleteConnie, thank you for such a nice comment! I was lucky I had lots of time to work on this block. Thanks for the info re fabric stretching. My friend Shirley thinks the fabric might have been cut on the bias, so I shall bow to her knowledge as she's a long time quilter.
ReplyDeleteHugs
Thank you so much, Wendy!
ReplyDeleteSuz, your work is absolutely stunning! Can't wait to see it in person. I know you keep saying you are a newbie to CQ, but you are definitely a natural and "get it" much more than I do. :)
ReplyDeleteThank you for creating such a wonderful block!
Such a sweet thing to say, Whytefeather!
ReplyDeleteI do hope you like your block when you see it in real!
lotsa Hugs
Oh no, not such a nubi!! It looks pretty darned good. Definitely one to be proud of and one that Stacie will cherish.
ReplyDeleteCarol
Thank you, Carol, for leaving such a nice comment! I was pleased with the result.
ReplyDeleteHugs from Suz
The stone path is my favorite but there are so many areas that delight the eye on this block...I also admire your honoring your tatting nature and using it in very unique ways. Love the ants, the rose arbor -- the whole thing!
ReplyDeleteThank you so much, Susan, for your wonderful comment! I'm thrilled you like it! I really enjoyed working on this piece. Have a great weekend.
ReplyDeleteHugs